Miss Ink Stamps

Bat Slider Halloween Card

CBK-#1

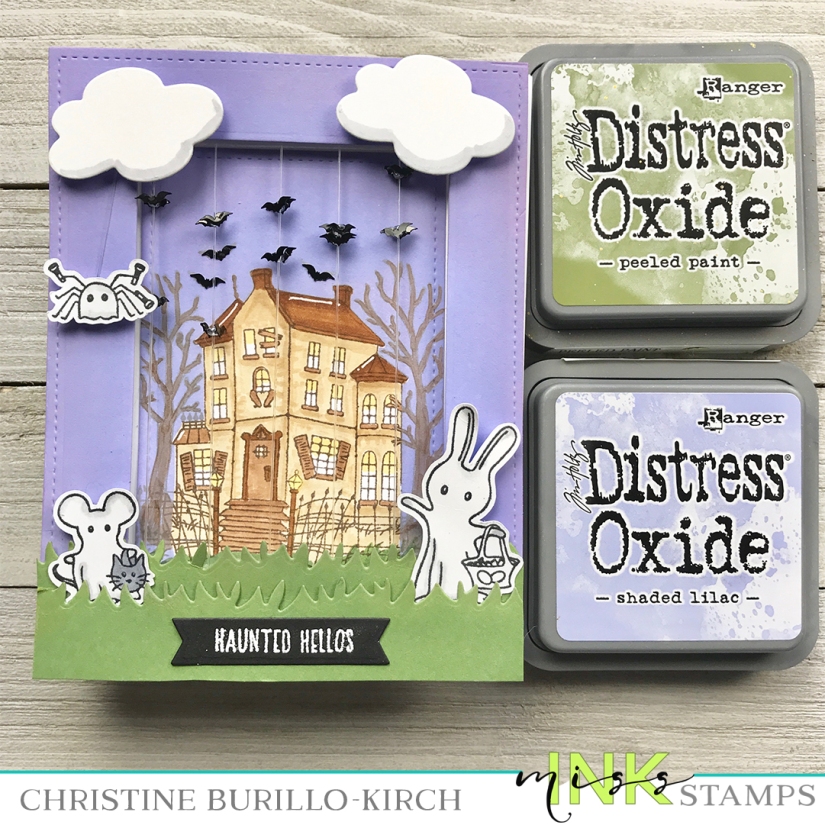
Today I have an interactive card that has bats flying in on the cute Halloween scene. I can’t help using the Boo Crew critters yet again, they are so adorable.

Briefly

  1. I die cut an A2 panel into 2 pieces: a frame and a smaller rectangular panel.  I stamped the smaller rectangular panel with the Haunted House stamp set, made a mask, and then ink blended with wilted violet distress oxide ink.
  2. I die cut 2 grass panels, some clouds and stamped & die cut the critters from the Boo Crew stamp set.  I copic colored the Haunted House and used soft grays to color the critters.
  3. I cut a series of notches into 2 small rectangular pieces and adhered them to the small panel containing the Haunted House.  Using some Stretch Magic jewelry cord, I adhered the end piece of the cord to the back of the panel, threaded 2 bats (2 bat sequins adhered to a bead) on each path and then threaded it through another notch and created another path for 2 bats to move up and down.  This creates a way for each bat to move up and down.
  4. Finally I adhered the small inner panel to the frame with several pieces of double sided foam tape and adhered all the die cut pieces prior to adhering to an A2 card base.

CBK-#2

Thank you for stopping by!

Trinity Stamps

Sleepy Hollow Framed Scene

CABK-frame unlit

Today, I’m sharing some tricks and tips to using the 4 piece stencil pack “Layered Birch” stencils. I’m making a scenic wall hanging that with light-up elements that showcase the “Sleepy Hollow” stamp set & die set.  Please find my video tutorial on the Trinity YouTube channel here: link.

Briefly, I used heavy weight vellum to create the entire scene with the exception of the woodgrain cardstock that outlined the frame and of course the box frame itself.

As shown in the video:

  1. I blended distress oxide forest moss for some grass on the bottom.  Then as shown in the video I created the layered birch tree look by using a light color (frayed burlap) for the trees further away, a medium color ( vintage photo) for the trees in the midground and a dark color (ground espresso) for the trees in the foreground.  I made sure to dry the vellum thoroughly between each stencil and I found that no smearing occurred- once it is dry, you can layer color over it without making a mess!  Finally I made a sky using several colors.
  2. I stamped all the images on vellum, die cut them and copic colored them.  Although the distress ink shows up quite well on the vellum, copic coloring is very light.  After figuring out how the scene would look, I made sure to exactly know where I wanted the background lit up.  Using the EZ-light power pack from Pear Blossom Press made it truly easy to get this effect and allowed me to forgo making a circuit with copper wire.

IMG_4525

Thank you for stopping by!
Supplies: (Affiliate links used at no extra cost to you- thank you for your support!)

Coffee, Coffee Loving Cardmakers, Trinity Stamps

CLC & Trinity Stamps Collaboration Hop

71564098_3608078722551713_74445119113134080_o

Welcome to the Trinity Stamps LLC“>Trinity Stamps & Coffee Loving Cardmakers Collaboration Hop.  If you came from the amazing Brenda Noelke’s blog, you are in the right place!

Today we are showcasing the Frappy Camper stamp & die set!  I used the super awesome Coffee Mug Card Die set to highlight this stamp set and placed a few cute trees from the Castle Scene Builder Set.   I put the gift card holder as a sliding feature right behind the front panel rather than inside the card as it was intended.  This card was simply made by blending several distress oxide inks for the background and copic coloring of images die cut from the Frappy Camper stamp set.

CBK#1CBK#2 

The Prize: A $20 Gift Card to Trinity Stamps; winner to be selected from participating blogs (must comment on all) by 10/22 at 11:59 PM PT. Winner will be announced 10/26 on the Trinity Blog.

Next stop on the blog hop is with the incredibly talented and wonderful Davina. Thank you for stopping by!

Blog Hop:

Trinity Stamps

Brenda Noelke

***Christine Burillo-Kirch*** You are here

Next stop —> Davina Cantrell

Courtney Kreeber

Emelie Hessler

Emily Mydlowski

Jeannie Lieu

Shanna Slater

Coffee Loving Cardmakers  

Amy Tsuruta 

Annette Allen

Kerry Urbatch

Helen Gullett

Lisa Bzibziak

Robyn Jordan

Lori Turner

Dana Warren

Erin Thiem

Katie Brooks

Kathy Schweinfurth

Lisa Golzbein

Thank you for stopping by!

Supplies used (affiliate links used at no extra cost to you- thank you for your support!):

Miss Ink Stamps

Spooky Critter Card

CBK1

Today I finally got a chance to use almost the entire adorable Boo Crew stamp set on a slimline card.  I tried to make a set of photos of the critters in front of the graveyard scene mounted on 2 panels that I had ink blended distress oxide ink on.

Briefly:

  1. First I made a slim line card with the dimensions 8.5 inches by 3.5 inches out of Neenah solar white cardstock, as well as a 8 inch by 3 inch panel.  I recently got a die that cuts “photos” from Ellen Hutson- so I prepared 3 for the card- again, out of Neenah solar white cardstock.
  2. I stamped all the images with Memento black ink, created masks, fussy cut the masks and applied them prior to ink blending. I used chipped sapphire and dusty concord distress oxide inks for the sky and scattered straw and a little dried marigold for the moon.  I put distress ink chipped sapphire on the card base and dusty concord for the card panel.  I made speckles on all the panels with Lawn Fawn liquid stardust and white acrylic paint.
  3. I copic colored all the images, the ghosts were colored with C3 & C00.  The pumpkins were colored with YR68 and YR27.  Finally I added some gold sparkle sequins and some spider sequins, as well as a black banner with a white heat-embossed sentiment.

Thank you for stopping by!

Supplies used: (affiliate links used at no extra cost to you- thank you for your support!)


Trinity Stamps

Autumn Mini Coffee Cup

CABK-cup

Today I have a project using the Coffee Bean stencils, Mini Coffee Cups, Mini Coffee Cup Sleeve & Decor die set and Autumn Forest Friends stamp  and die set. The video can be found here: link.

Briefly, I die cut the large and small coffee cup sleeves from the Mini Coffee Cup Sleeve & Decor die set out of Neenah white solar or kraft cardstock respectively.  I also die cut the circle, scalloped-edged circle and coffee beans out of the same die set.

Using a larger version of the Blending Buddy, I ink blended ground espresso distress oxide ink over the Coffee Bean stencil onto the larger white coffee cup sleeve, let it dry completely and then spread Creative Expressions Paste in Frosty Dawn with a palette knife over one of the stencils.  It does take a while to dry and you want to make sure it is completely dry before you do the other stencil (that cover the other half of each coffee bean)!

While the paste was drying, I stamped and die cut the adorable fox from the Autumn Forest Friends stamp set.  I did some simple Copic coloring and used a white gel pen for accents.  I also die cut a tag from theMini Coffee Cup Sleeve & Decor die set out of Neenah white solar cardstock and stamped a sentiment from the Autumn Sentiments stamp set.

Finally, I just adhered everything together as shown in the photo!  Thank you so much for stopping by!

Supply list- affiliate links used at no extra cost to you- thank you for your support!