Miss Ink Stamps

Masculine Winter Card Part 2

CBKdec29

I again needed a masculine card for my husband, so I decided to use the lovely Snowy Village stamp set again as it reminds of the village he grew up in- a very small town in Germany that has several houses surrounding a church at the very center of the village.

Since Christmas is now over, I decided to make it a “Celebrate the Season” card and decided to pair the Season’s Greetings stamp set with the Snowy Village stamp set.

To make the card:

  1. I stamped the Snowy Village scene with copic-friendly Momento Black Tuxedo ink onto 110 lb Neenah Classic Crest Solar White cardstock and on Avery Self-Adhesive Laser ID Labels that would be used as a mask.  I fussy cut the mask and then placed it onto the cardstock and blended shaded lilac Distress oxide ink on the bottom and tumbled glass Distress oxide ink on the top before removing the mask.
  2. I added the most ink to the bottom layer of snow and then added some Couture Creations sparkle paste in “Frosty Sparkle” to really accent that snow bank. I also added the sparkle paste to the roofs of the houses with a paint brush.
  3. I copic colored the rest of the image (trees are G46, YG61 and YG67, E23 & E37 for the stumps) and the houses were colored very simply with (C3, W3, E31 and E50 for the windows to give the appearance of light).

CBKdec29

Thank you for stopping by!

Trinity Stamps

Bookmark Mini Card

Bookmark #1

Hi there! There have been so many awesome products that I have not had the chance to use yet and today I was itching to use the Gingerbird House stamp and Gingerbird House Die sets.  I also wanted to make a smaller card using the Narrow Card and Bookmark Die with Envelope set including having a removable bookmark.

To make the card:

  1. I die cut a scalloped panel, bookmark and bookmark notches from the Narrow Card and Bookmark Die with Envelope die set in heavy weight cardstock.  I also made a card base with Neenah solar white 110lb heavy cardstock by taking a 6 inch by 6 inch piece and scoring it down the middle at 3 inches.  The resulting card base is 3 inches length by 6 inches height as shown below.Bookmark #2
  2. I then stamped the Gingerbird House stamp set images in Memento Tuxedo Black ink onto 110 lb Neenah Solar White cardstock and die cut the images with the corresponding dies from the Gingerbird House die set.  I copic colored the images as follows: the birds were colored with R32 & R35, the heart was colored with R35, the house was colored with BG0000 (snow) and the rest with E23, E37, E31, R00 and R30.  I added some white gel pen accents as well. I die cut the circle in the bird house so that I could put a bird in the house- I simply had to use a circle die that I had, as the Gingerbird House die set does not come with one. Bookmark #3
  3. To finish the card, I put double sided foam tape on the back of the house and everything else (panel, heart embellishments, hello die cut) was adhered with Gina K connect glue.  I used twine to make a bow for the bookmark. I did not adhere the bookmark to the card so that the recipient could actually use the bookmark!Bookmark #1

I hope that you like the project- thank you so much for stopping by!

Supplies:

Stamps: Gingerbird House stamp set

Dies:  Gingerbird House Dies

Narrow Card and Bookmark Die with Envelope

Hello Senti mini die set

Embellishments: Sweet & Tart Heart Sprinkle Embellishments


Miss Ink Stamps

Masculine Christmas Card

CBKdec22

I struggle with making masculine cards and perhaps this might consider this to be so, but the absence of any pinks, reds and the focus on nature, blues, greens & browns, is probably as masculine a card as I am capable of making.  This is probably as CAS as I can get, as I generally prefer to make busy cards.

To make this card:

  1. I die cut a A2 background panel with a rectangle stitched die from Neenah 110 lb Classic Crest Solar White cardstock and then added some flurries with a background die from Concord & 9th called “Swirls” die. This was used to create movement that would make the focal point (deer & trees) even more pronounced.
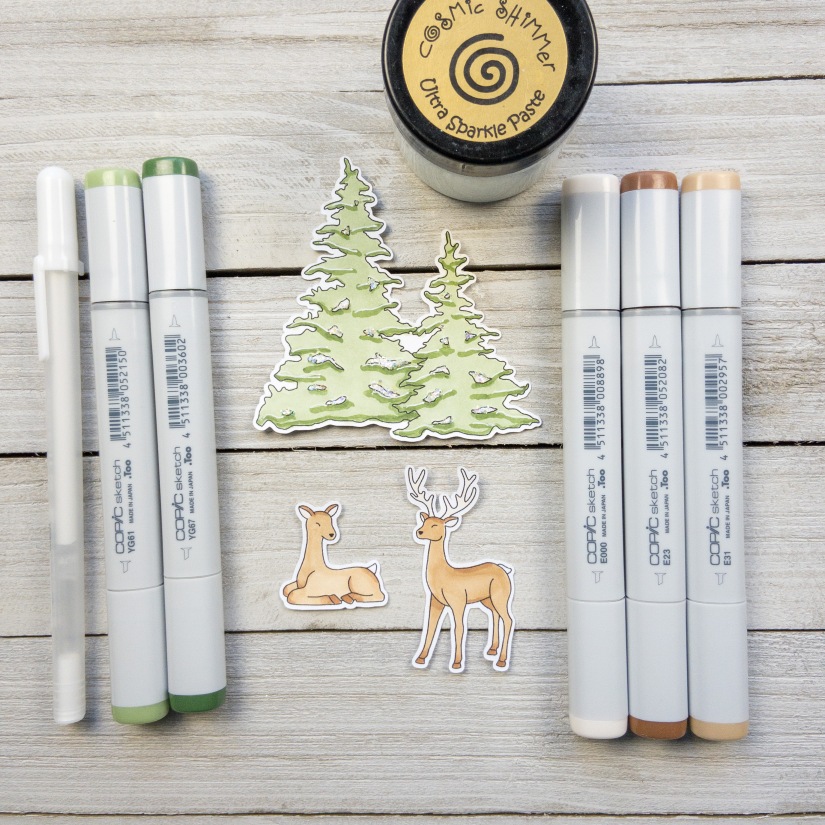
  2. I decided that I wanted a little snow patch for the deer to stand/lie on, so I used the Scene Builder Stencil and applied some Cosmic Shimmer Paste in “Frosty Sparkle” as shown below.APC_0005
  3. Next I stamped the deer and trees from the Oh Deer stamp set copic-friendly Momento Black Tuxedo ink onto 110 lb Neenah Classic Crest Solar White cardstock and die cut them with my Brother CutnScan 2.  I used the Copics E000, E23 & E31 for the deer and YG61 and YG67 and a white gel pen for the trees.  I also added some sparkle paste with a paint brush to the areas on the tree that indicate some snow.APC_0004
  4. Finally I stamped the sentiment from Season’s Greetings stamp set in copic-friendly Momento Black Tuxedo ink onto 110 lb Neenah Classic Crest Solar White cardstock and die cut it with a simple banner die that many companies have.

Thank you for stopping by!

Miss Ink Stamps

Watercolor Wonderland

CBK4

I love to watercolor and upon seeing the lovely Snowy Village stamp set, I knew that I wanted to do a soft watercolor wash to set a snowy scene.  On the inside I’m using the Calm & Bright stamp set as the focal point that continues the snowy scene.

To make the card:

  1. First I cut an A2 panel of Tim Holtz watercolor paper, and I stamped the Snowy Village using Distress Oxide Ink in “Gathered Twigs”.  All the distress inks (oxide and regular) are terrific to use as a watercolor medium, so after stamping, I simply wet a brush and pulled some of the color from the edges of the stamp, being careful to work in isolated areas.CBK2
  2. I wanted a soft muted look, so I used then watercolored using The Stamp Market’s inks in Mossy, Blush & Sea.  Here is a photo showing that I simply smush some of the color onto an acrylic block, dip my paint brush in water and grab some of the color to paint.  In the last photo you can see the final colors I chose for the houses, some are left in white, some are painted in blush and some are a combination of scattered straw (distress oxide ink)/ cherry (The Stamp Market).CBK6
  3. I die cut all the components need to make the inside pop-up using Lawn Fawn’s Pivot Pop-up dies.  I wanted the adorable critters to be resting on a snow bank and felt it was easiest to use this interactive die set.  All the components are cut out of 110 lb Neenah Solar White Cardstock, except for the panels which are cut out of Tim Holtz watercolor paper.  Add adhesive to all the areas as shown; Lawn Fawn has the best tutorial for showing how to put the card together.CBK3CBK1
  4. I stamped the adorable critters from the Calm & Bright stamp set in distress oxide ink gathered twigs and watercolored the animals in a similar manner as I had done for the front panel.  Finally I stamped a sentiment from the Calm & Bright stamp set in Memento Tuxedo Black ink.
  5. I adhered the panel in the middle of the inside of the card as shown below:CBK5

I hope that you will try some watercoloring- it is so much fun paired with these adorable stamps!  Thank you for stopping by!

CBK4

Trinity Stamps

Meowy Christmas Shaker Ornament

Cat ornament

Welcome! Today I’m making a Christmas ornament using the Tall Dome Shaker Set and filling it with items from the Layered Pine Stencil & Do Re Me Ow stamp & die sets. I’m on the Trinity Stamps YouTube channel here: video link.

Briefly:

  1. I stamped numerous elements from the Do Re Me Ow Stamp set with Black Versamark ink onto 110lb Neenah Solar White cardstock and die cut them with the Do Re Me Ow Die set.  I copic colored the cats with several colors as shown in YouTube video.
  2. I ink blended with the Trinity Stamps Blending buddy on the Layered Pines Stencil and fussy cut each tree out.  They aren’t symmetrical, so be sure to add a little ink to any white areas that show through.
  3. I die cut 2 domes out of white foam, 2 domes out of woodgrain cardstock, and 2 domes out of acetate sheets.  One creates a sandwich for each side (woodgrain dome, acetate sheet and foam dome), places the tree and shaker bits inside each half before gluing everything firmly. An embellishment for a label from the Seasonal Cup Decor & More die doubles as a place to attach a ribbon/twine to hang the ornament.


Thank you for stopping by; I hope that this inspires you to use the dome to make an ornament.  Please share and tag me on social media- I would love to see what you make!

Supplies:

Stamp sets:  Do Re Me Ow Stamp set

Die Sets: Do Re Me Ow Die set & Tall Dome Shaker Die Set

Stencils: Layered Pines Stencil

Cat ornament


Miss Ink Stamps

Woodcut Floral Wreath

CBK2

Welcome!  Today I’m on the Miss Ink blog using the delightful Woodcut Floral Stamp set.  I love how Miss Ink pairs a background stamp set with several images, I decided to make the images the focal point of the card by having them make up a wreath.

To make the card:

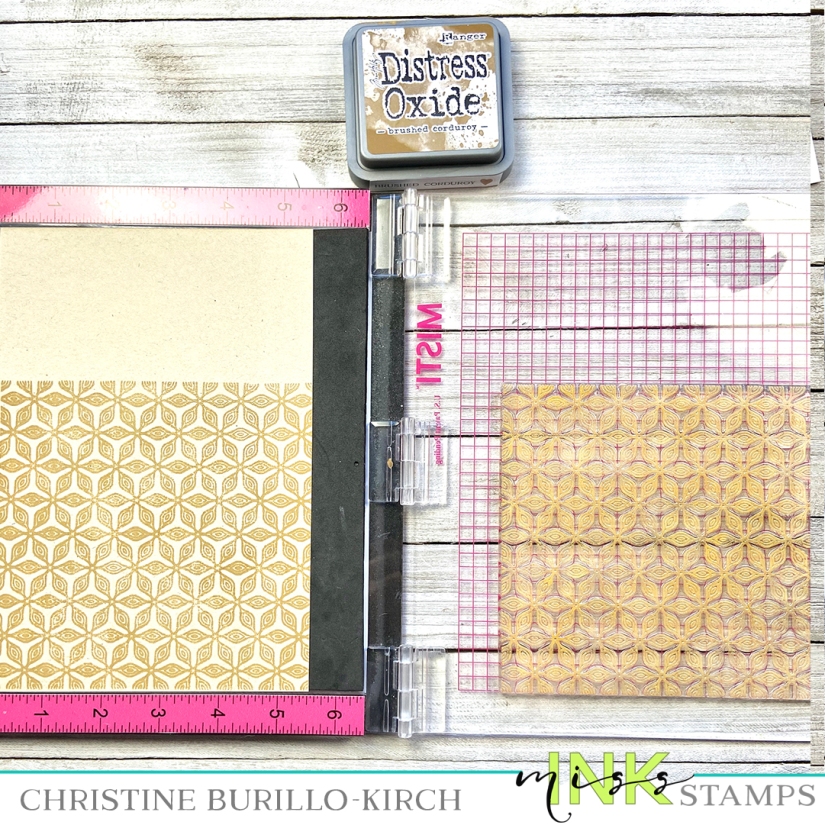
  1. First I stamped the background image onto a A2 panel of kraft cardstock using my Misti and Brushed Corduroy Distress Oxide Ink.  You don’t have to use a Misti, but I find it so much easier to ensure an even impression.  I then die cut the 6×6 inch image with an A2 stitched panel die.  I used the same cardstock to create an A2 card base.CBK5
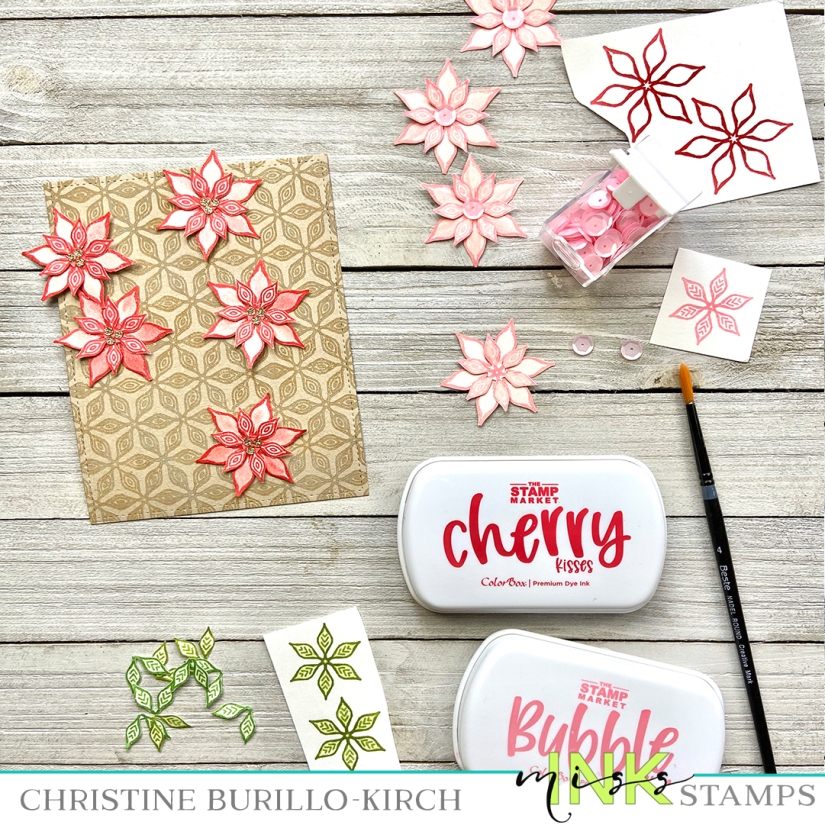
  2. I then stamped a whole lot of the large floral & smaller floral images using The Stamp Market new inks in cherry & bubble onto thick watercolor paper because I wanted to create a watercolored wreath. I then smushed the ink pads onto an acrylic block, added water and watercolored with the same ink I had stamped with; a final touch of shimmer was added using a shimmer brush.
  3. I spent quite some time fussy cutting the florals & the leaves, but it is fun to do when you pair it with something else, such as watching a Christmas movie!  The photo below shows that I made leaves by using a shortcut.  I stamped one of the floral images (that has veins like leaves do) in The Stamp Market’s mossy green ink and then cut it into 3 sets of leaves.  This does cut down on the amount of stamping that you have to do!CBK3
  4. After all the cutting was done, the florals were glued together with Gina K connect glue and I either added 3 dots of gold glitter cardstock to the middle of the flower or a sequin.  I then played around with placement for quite a while before adhering everything down to the card panel.  Finally I stamped a sentiment from the Oh Deer stamp set onto white card stock in black Versamark ink and placed it offset in the center of the wreath.

CBK2

Thank you so much for stopping by!
Miss Ink Stamps, Uncategorized

Interactive Woodland Hearth Card


Welcome!  Today I’m making an interactive card with the adorable “Woodland Hearth” stamp set from Miss Ink Stamps.  I thought that the large image (hearth) lent itself well to  creating a framework for the scene in the inside of the card.

To make the card:

  1. I stamped the images and fussy cut the hearth to create the framework for the inside scene. I stamped all the images onto 80 lb Neenah solar white cardstock and used a Brother Scan n Cut to cut the images.  I scored the hearth to create folds so that it would fit inside the card base (3 1/4″ x 2 3/4″ folded).  To create the card base I cut a 6 1/2″ x 2 3/4 panel of blue cardstock and scored it at the 3 1/4″ spot.CBK1-2
  2. I copic colored all the images for the inside of the card and die cut a little snowbank that I placed behind the hearth.  I fussy cut the hearth as shown and simply scored it in the middle and folded on the score line. I then eyeballed where I should score at the ends of the hearth so that it would fit inside the folded card- there is a lot of flexibility- you can chose to score where-ever you would like.  I adhered snowflake embellishments and used a white gel pen to create snowflakes for the inside and outside of the card.  Finally a die cut 2 inch circle with the bunnies finished the front of the card.CBK1-1

Thank you for stopping by!