Miss Ink Stamps

Gel Press Techniques with Stencils.

Hello there, Christine here with a card showing one of the backgrounds I made using the Art Deco stencil and a gel press.  The background I made for the card felt almost like the Northern Lights, so I added some images from the Oh Deer stamp set to create a finished scene.

Here is a video showing the entire process and lots of ideas how to use stencils with a gel press- I just had a lot of fun, didn’t think too much and created a lot of backgrounds.


I used a 5×7 gel press with a number of distress oxide inks including: faded jeans, broken china, speckled egg, bundled sage, shaded lilac and rustic wilderness.  I splotched the color directly onto the gel press, used a roller over it to spread out the color, placed the Art Deco stencil on top and then pressed some 110lb Neenah solar white cardstock on top.  

Did you know that you can do embossing with stencils as well?  Once I made one print after removing the stencil, I put the stencil itself (that had color from the gel press on it) onto another piece of cardstock and ran that through my die cutting machine. Just make sure to rinse everything (roller, gel press and stencil) off with some warm water in between each background!

I chose one background for the card that I had created with faded jeans, broken china, speckled egg distress oxide inks and some Couture Creations Glitter Paste. To finish the card, I colored some images Oh Deer stamp set that I had die cut with my Brother CutNScan2 with some simple copic coloring.  The star of the show is definitely the glittery background made with the Art Deco stencil.

Thank you so much for stopping by!


Miss Ink Stamps

Rainbows for Turner Syndrome

Hello there, Christine here wishing you a very Happy Valentine’s Day!  I’m here with a card that I made for the Turner Syndrome Awareness Blog Hop (Miss Ink Stamps is a sponsor!).  I wanted to make a sunshine and rainbow card using a happy little critter, so I took my favorite Miss Ink stamp set Punny Farm Goats and made the sunshine with the Floral Stained Glass stencil and simply added lots of butterflies!

To make the card, I ink blended scattered straw distress oxide ink over the stencil and then immediately added glitter paste over it (Frosty Sparkle, Couture Creations).  I die cut papers that matched the color palette from the hop (except for the blue) and clouds using a die set from Trinity Stamps (Slimline Rainbow Builder die set). I spent quite a bit of time making everything fit nicely on the A2 card.  I added some B000 copic outline to the clouds.

I added color changing butterflies, Dazzle Butterflies, and made a slanted photo above, so that you can see the color shift. I also added some pink Watercolor Butterflies to highlight the sentiment that I used from the Hippo Hooray stamp set.  Finally, I added my beloved happy little goat from the Punny Farm Goats stamp set and colored him simply with W0 and W3.

Thank you so much for stopping by!!

Miss Ink Stamps

“I’m Late” Birthday Card

Hello there, Christine here.  Today I have a trifold “missed your birthday” card using Alice stampSmokin’ Caterpillars stampUnbirthday stamp and the Vintage Keyhole Stencil.

First I cut 2 A2 card bases, with one having a tiny strip extra cut off (1/8 of an inch) on one side.  To put the trifold card together, place both A2 card bases with the opening facing each other (so one will be backwards).  Slide them over each other so that they are overlapping (like a sandwich- one side from one card is on top of the side of another card).  Glue the bottom 2 layers together and then you have a trifold that opens to the right and the left as shown below:

I then set to work on the components, I used Versamark Ink on the Vintage Keyhole Stencil and then heat embossed Wow embossing powder in “Under the Sea”.  I found a matching cardstock in my stash and cut an oval shape in it to ground the scene.  

I die cut the images and sentiment from the Alice stamp and kept the color scheme to an aqua color and used the following copics : BG32, BG13, BG11 for Alice’s dress and the rabbit’s coat, Y28 for the watch, YR21 & Y21 for Alice’s hair and W3 & W0 for the white rabbit.

I created a cardstock panel for the inside of the card with my Gelli Press and three distress oxide inks: speckled egg, rustic wilderness & bundled sage.  I stamped the sentiment from the Unbirthday stamp with Versamark Ink and then heat embossed Rose Gold embossing powder from Avery Elle. 

Finally I die cut an image from the Smokin’ Caterpillars stamp and kept the copic coloring simple.  Thank you so much for stopping by, I hope that you will give the trifold card a try!

Miss Ink Stamps

Frosty Box Card

Hi there, Christine here with a box card using the Snow Buddies stamp and Art Deco stencil.  I used the stencil to create a glittery background that I then die cut to make the box card more interesting.

I first created a background piece with the Art Deco stencil, by ink blending distress oxide inks in faded jeans, shaded lilac and speckled egg splotched onto a gel press with the stencil on it.  I then removed the stencil and placed a piece of cardstock onto the gel press.  I let the paper dry and then put the stencil back on and put glitter paste over all the colored areas. A video will be coming out soon that shows how I did this.  I then used the dies from the box card die set to created little decorative panels for the card.

 I die cut the main box pieces from Neenah solar white 110lb cardstock and put them together.  I added the decorative panels that I had made with the Art Deco stencil, as well as a sentiment from the Snow Buddies stamp.

I then colored some images from the Snow Buddies stamp set with some copic markers, Bunny (W3, W0, B66, B63) Snow Bunny (WO, E37, G24, G28) and Hedgehog (E37, E34, E31, B66, B63) and adhered them as shown above.

Thank you so much for stopping by!

Miss Ink Stamps

Sympathy Card

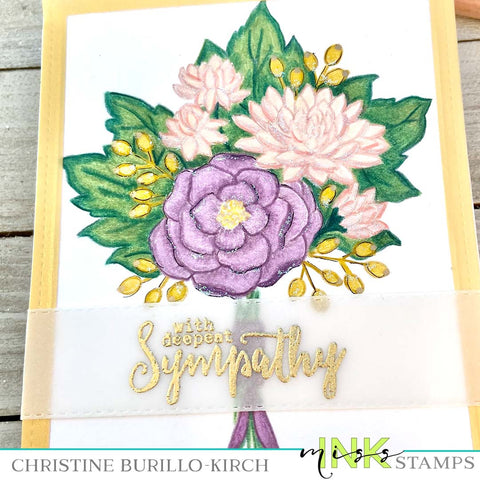
Today I have an A2 sympathy card using the Fall Bouquet stamp set and a sentiment from the Magnolia Sympathy stamp set. I did some no-line coloring and used colored pencils and gamsol.

I stamped the image Fall Bouquet stamp set onto Neenah cardstock with Ink on 3 fade out ink.  I colored with Caran d’Ache colored pencils, spending a lot of time going over sections with different colors. There is no trick, you just keep blending until you’re happy with the result and then I used gamsol to smooth everything out.

I then added some glitter paste to highlight certain areas and added some black, gold and white gel pen details as can be seen below. 

Finally I stamped the sentiment Magnolia Sympathy stamp set with Versamark ink and then heat embossed with gold glitter embossing powder onto heavy weight vellum (Bazzill).  I also created a frame out of gold vellum by using 2 rectangle dies I had in my stash.

Thank you for stopping by!

Miss Ink Stamps

Underwear Wreath Card

Hello there, Christine here with an A2 card that uses he sentiment is from a stamp set from the newest release I Believe and pairs it with a wreath and the Floral Wave Stencil!  

I started by spreading Cosmic Shimmer Sparkle Texture Paste (Aurora shimmer) over the Floral Wave Stencil onto 110 lb Neenah solar white cardstock. I set it aside to dry overnight. There is no color underneath, but just the sparkle paste itself provides interest and creates a lovely background as you can see below. The wreath was created with a die I had in my stash and I die cut 2 different shades of green with it.

In the meantime I cut out the images and sentiment from the I Believe stamp set and then did some really simple copic coloring with red tones only (R46, R59) to create some contrast to the green stems of the wreath.  The sentiment itself really does so much for the design of the card that you don’t have to spend much time on the other images for the card to feel finished.  I added some gold baubles (Trinity Stamps) and twine in green and gold to just tie everything together.

Thank you so much for stopping by!

Miss Ink Stamps

Peace & Joy Slider Card

Hi there, Christine here with a slimline slider card using the new stamps sets Little Angel and Mountainside. I love both of these sets so much that this is the second time I’ve used them together, but this time I’ve put them together this time on a slimline card and used different techniques.

First I die cut a Slimline Slider base and pull tab (Trinity Stamps Slimline Surprises die set) out of 110lb Neenah cardstock in solar white.  I taped all the edges off and ink blended a pink sky using distress ink in tattered rose and the edges in worn lipstick.  I only lightly inked the center behind the trees.  One tip is to prep your die cuts before you ink blend, place everything where you want it and then ink blend accordingly.

I used a new to me product that has been in my stash for a while- Nuvo Mousse in powder blue and seaspray green.  I love to play with new things and while ideas don’t always work out, I get better at fixing them to my liking.  I “painted” the mousse on with a paint brush and the seaspray green ended up being too dark, so I added some Cosmic Shimmer Sparkle Texture Paste in Frosty Kiss over it to lighten it up. Finally I did some ink splatters with white acrylic ink to create more variation in the sky.

I set the panel aside to dry, and then glued on my die cut from the Mountainside stamp set that I had cut with my Brother ScanNCut2.  The trees were copic colored with G24 & G28 and the mountains were colored with W3 and W0. There is a video over at Trinity Stamps on how to assemble a slider card, so I won’t elaborate here.

I die cut the images and sentiment from Little Angel in the same manner with my Brother CutNScan2. The bunny was copic colored with C3, C0 and R00, the angel was copic colored with E31,E34 (hair) E000 (skin), R00, R30, R22, E31 (dress & shoes) basket & contents with W0, W3, YR15, YR68, E34, E31 and G24.

I wanted some gold around the sentiment to make it really stand out, but I didn’t want to use gold acrylic paint, so I tried to make a light gold glittery paste by combining Perfect Pearls in Perfect Gold with Cosmic Shimmer Pal Blaze Polish and painted it on.  It was a bit heavier than I wanted it to look, but it certainly is dramatic!

The Slimline slider card allows the recipient to pull on the top tab so that the scene can stand up as shown in the photo below:

Thank you so much for stopping by- wishing you a wonderful day!!!

Miss Ink Stamps

Pour the Merlot!

Hi there, Christine here with a glittery card using the new stamp set Blitzened that I have paired with a stencil called Art Deco.  Our poor little reindeer looks like he has definitely hit the wine during a Christmas party the night before.

First I die cut an A2 panel with a stitched rectangle die I had in my stash and taped off the outer border. I then ink blended with distress oxide ink in bundled sage over the Art Deco stencil and immediately added sparkle paste (Couture Creations) over the inked areas. I set the panel aside to dry overnight and immediately washed the stencil. 

In the meantime I die cut all the images & sentiments from the Blitzened stamp set and did some simple copic coloring (E35, E31, W0 for the reindeer, G24 for the bottle and Y11 for the lights). I love that the image has so much on it and tells a story that you really don’t need anything else to complete the card!  I die cut a border in light green cardstock that I had in stash to complete the card.

Thank you so much for stopping by!  Have a wonderful day!

Miss Ink Stamps

Not a creature was stirring, not even a mouse.

Welcome, I hope that you are as excited about the new release as I am. So many fun sets that absolutely make me smile that are more for adult recipients. Today I’m sharing the new stamp set called Blitzened that I have paired with a stencil called Art Deco.

First I die cut an A2 panel with a stitched rectangle die I had in my stash and taped off the outer border. I then ink blended with distress oxide ink in tattered rose over the Art Deco stencil and immediately added sparkle paste (Couture Creations) over the inked areas. I set the panel aside to dry overnight and immediately washed the stencil. In the photo below, you can see the amount of texture and shine that it provides to the card!

In the meantime I die cut all the images & sentiments from the Blitzened stamp set and did some simple copic coloring (R59 & R46 for the candy cane & berries, G28 & G24 for the leaves, B000 and B0000 for the glass, W3 and W0 for the mouse). I love that the image has so much on it and tells a story that you really don’t need anything else to complete the card!

The Art Deco stencil design creates so much interest, but not in an overwhelming way, so that you eyes move all over the card, but the focal point still clearly remains on the mouse.

Thank you so much for stopping by!

Miss Ink Stamps

Hay There Morning Magic Card

CBKAug23-1

Hi there!  Today I’m sharing a card that depicts the magic of early mornings to me. I didn’t grow up on a farm (I wish I had though), but I’ve always been an early riser and would go for early morning runs.  I’m using Hay Daze slimline stamp set paired with the Ei-ei-o Word dies.

It funny, because I often with start out with a vision and end up with something different.  I had thought that I would do snapshots of the farm with some photobombing critters, but it just took too much away from the view.  I guess that I love early morning views, it reminds me so much of lazy early mornings growing up, when usually the only other person up in the household was my dad.

I die cut slimline panels using Trinity stamps dies, and set to work using copic markers instead of watercolors as I have been doing lately. I used 3 sets of markers for the grass YG67, YG63 and YG61.  I am slowly expanding my copic marker set and the color I have most of is green(s).  To create highlights, I added white gel pen markers, colored over the marks with YG63 and then added Cosmic Shimmer Paste in Frosty Dawn Sparkle with a paintbrush as you can see below.  The paste has light coral sparkles that really add a lotto the morning scene.  I added them all over- all the patches of grass and the the HAY there sentiment from the Ei-ei-o Word dies.  I cut out 3 sets of die cuts to layer on top of each other to create dimension, followed by painting with glitter paste for sparkle.

CBKAug23-3

Finally I colored the rest of the scene, Y23, Y21 & Y000 for the flowers and sun. Stampin up markers in Dark & Light crumb cake for the fields, hay and fence. The barn in R14 & R35, the roof and silo in C3 & C5 and the inside of the flowers in Y38, YR24 and YR27.  If you don’t have a color that you want to use- just layer copics over one another- for the inside of the flowers I use Y38 and YR24 layered over it.

Thank you for much for stopping by today!  Wishing you a crafty afternoon!

CBKAug23-2