Technique Tuesday

Sweet Hogsmeade Layout

CBK-Jan#1

I have another traveler’s notebook layout for you today. I’m guesting at Technique Tuesday for the next few months; I’m focusing on the newly released Sweet as Candy Stamp set & dies and the Candy Jar crafting dies.

To make the spread:

  1. I used a 8.25 inch by 4.25 inch insert (standard size) and cut 2 panels (8 inch by 4 inch) out of cardstock with a fancy script on it.  I painted a faint amount of white acrylic paint over the areas that were going to focus my photos.  The photos always drive my design; I had chosen those first and die cut small polaroid-type frames which I adhered on top of each photo.
  2. I stamped and die cut each of the images from the Sweet as Candy Stamp set & dies onto to Neenah Solar White Class Crest 110 lb cardstock, which I then copic colored and put highlights on with a white gel pen.  I die cut the jar out of vellum and had extra hearts that I had cut out with the Candy Jar crafting dies.  I adhered everything to the page, including cardstock alphas and glitter stars that I had in my stash.
  3. I thought the Candy Jar crafting dies would be perfect for making a shaker clip that would further highlight the spread.  To make the shaker clip, I had to adjust some of the die cuts as shown in the photos:

    I die cut the entire jar out of blue cardstock, white cardstock, blue vellum, acetate and foam; I cut the lower part of the foam piece off as shown in the photos so that the jar would fit with the lid. I also had to make impressions with the die cuts so that I could cut out the outline of the entire jar in white cardstock and acetate. For the bottom part of the jar, I adhered the blue cut cardstock to the acetate piece that spanned the entire bottom of the jar, which was then adhered to a foam piece- this creates a capsule for the shaker that contains all the shaker pieces.  The foam lid was adhered to a white cardstock piece that spanned the entire candy jar (again I ran a piece of cardstock with an embossing pad so that the outline of the candy jar could be impressed on the paper that I could fussy cut by hand.  I adhered the inner vellum piece to the same white cardstock piece.  Now was it was time to fill the shaker, so I die cut lots of hearts out of heavy cardstock that I had on hand and then applied some glitter glue on top for shimmer.  Once dry, I put the shaker pieces in and adhered the jar shut.  To make it into a clip, I impressed and fussy cut 4 more pieces of the entire jar onto the Neenah 110 lb cardstock and fussy cut a notch for the paper clip into 3 pieces.  I glued the 3 pieces with the notch onto the back of the shaker first, then hot glued the clip in and then sealed the entire shaker clip with the final un-notched piece.  This is definitely easier to show in a video, than describe in a blog post, and if there is a lot of interest, I can make a video.

Thank you for stopping by- I hope that you will give the traveler’s notebook method of memory keeping a try!

Trinity Stamps

Traveler’s Notebook Spread

magical day

Today I’m going to talk about doing a little bit of mixed media (just dabbling really), but in a traveler’s sized notebook insert that fits in a Standard Midori.  Often mixed media is done on a canvas or in a mixed media journal/notebook.  My favorite mixed media artist is Vicky Papaioannou, you can find her videos here, her videos are so informative and also relaxing.   I was fortunate to meet her at Creativation and she is so kind in person.  Anyway, I’m not a mixed media artist by any stretch of the imagination, but just someone dabbling in creating things other than cards occasionally.

I used a watercolor notebook from Traveler’s Company (a Japanese company that created the Midori traveler’s notebook), but there is no need for you to use this.  You don’t have to use a notebook at all, just a sheet of watercolor paper or heavy cardstock!

Magical scene2

First I tested several distress oxide inks to get a sense of which colors I wanted to use. Below is a sample I made; I modified it when I actually prepared the notebook spread.

Magical scene3

I stamped several images from the Magical Wizards set on the page and made several masks.  I also made masks from the clouds in the Castle Building Die set.  Using a blender brush, I blended chipped sapphire and faded jeans distress oxide inks as shown, and then sprinkled gold watercolor. Stars drawn with a white gel pen helped fill the scene.

Magical scene

I die cut more images from the Castle Builder set, copic colored the images, stamped a saying from the Magical Sentiments stamp set and heat embossed with gold embossing powder.  Finally I prepared the images of Hedwig the owl and Fawkes the phoenix with copics and a little heat embossing, since I felt the 2 page spread needed a little bit more interest.

Thank you for stopping by!
Affiliate links are used at no extra cost to you- thank you for your support!

Embossing, Trinity Stamps

Magical Wizard Valentines

wowbloghopcbk

I love to give my daughter a little card and gift each year for Valentine’s Day. This year I decided to change things up and make a little Valentine’s display that can be hung up on a wall or on a door.  We both happen to love the Wizarding World of Harry Potter and so I thought that I would combine the two and make it a Harry Potter Valentine’s Day. I used the Wizard Friends stamp setand the Magical Sentiments stamp setand die set.

Not having a die cut to make what I envisioned, I turned to my Silhouette Cameo and made a heart with a stitched line rectangle inside.  You can easily make one yourself, or feel free to download the one I made here.

I love to add sparkle to anything I make, so I decided to start out with Crafter’s Companion Shimmer Cardstock in rose pear; my cameo cut these out easily using the setting for “Silhouette-brand” chipboard (this cardstock is quite thick).  I then cut out 2 inch by 3 inch rectangles of lighter weight Neenah cardstock as can be seen in the photo here:

img_2875

I ultimately decided for even more sparkle using various WOW embossing powders listed at the end of this post and shown here:

img_2872

I decided to stamp my images with ink first prior to heat embossing with WOW powder.  Using a MISTI or similar tool allows one to do this easily. Simply stamp with the desired copic-friendly ink, wipe off the stamp then copic color so as not to have your copic colors interact with the embossing powder.  Now place the image again in the same spot in the MISTI, ink up the stamp with versamark ink and stamp again.  Add your favorite embossing powder and then heat set with a heat gun.  Easy peasy and the results are lovely!  I chose to do it this way because 1) some lighter embossing powders do not show up as well on light cardstock and 2) some images, such as the phoenix, need a mixture of gold and red to really come to life.

Once you have finished a 2 inch by 3 inch panel, adhere it to one of the hearts within the outlined area.  Gently fold along the dotted lines to make the heart into an envelope.  Adhere a inch ribbon to the front (as shown in the photo below); using this length of ribbon will allow you to intertwine the hearts as shown in the first photo. As a final touch you can add a heart to cover up the ribbon, so that when you fold it up, it will look like an envelope.

I hope that I inspired you to make your own valentines this year for all your valentines!  Thank you for stopping by!

All links below are affiliate links- they will lead you to Ellen Hutson’s shop where I will receive a small commission at no extra cost to you.  Thank you for your support!


Trinity Stamps

Traveler’s Notebook Layout with Wizard Friends

youtubejan 19

I’m up on the Trinity Stamps YouTube channel with a video on how to make this traveler’s notebook insert layout.

First I printed out the Marauder’s Map from a tutorial found here; all the files that you need to make it can be downloaded in a safe zip file.  I used printer paper to print the files needed to make the Marauder’s Map, because I didn’t want to add too much bulk to the insert.  The insert is a standard Midori size (8.25 in by 4.33 in).

The insert itself is made with thick cardstock, patterned paper and vellum.  Don’t be afraid to make an insert with multiple types of paper in it- I think it creates interest and actually sparks creativity.

I hope that you will try to make a layout in a traveler’s notebook insert- the size is perfect for discretely journaling and documenting your trip or any new adventure!

Thank you for stopping by!

Trinity Stamps

Interactive “Magical” Card with Mini Internal Lantern

youtube jan 5youtube jan 5-2

Today I’m up with a new video, you can find the YouTube video here .  It is a take on a lantern that I made a few weeks ago.  I love to extend the use of a card by transforming it  something interactive.  I hope that the user will put a tea light/votive candle and use the card as intended!  Full details of the process can be found in the video.

Below are links to supplies used for this project; affiliate links are used at no extra cost to you.  Thank you for stopping by!


These are also available at Trinity Stamps!

Tools: Blendability brushes

Stamps: Wizard Friends, Magical Sentiments

Dies: Wizard Friends, Magical Sentiments, Castle Scene Builder

Inks: Distress oxides

December Daily, Trinity Stamps

December Album with Trinity Stamps

YouTube 12-8

Today I’m on the Trinity Stamps YouTube Channel with day 1 of an annual album I do each December.  The premise of this is to journal & document each day of the Christmas season (Dec 1 until the the 25th).  I have done this project for the last 7 years and I love it.  I’m not entirely sure whose idea this originally belonged to, but 2 creative ladies lead this project in their own way each year.  Ali Edwards does a December Daily and Shimelle Laine does a Journal Your Christmas.

Having done an album for the last 7 years, I have my own way that I tend to make my album.  I am more laid back about documenting each day, often we are so busy that I will just put some Christmas cards from beloved family members in a certain day if there is really nothing Christmas-sy to document.  I also don’t journal as much, and usually let the photos do the “talking” and just a few thoughts written down.

Today I’m showing Day 1 of the album during which my daughter received her Funko Harry Potter Advent Calendar- we were both so excited to get this calendar, so I wanted to document it on Day 1 with the lovely Trinity Stamps stamp set Magical Wizards.  The video shows how I set up my days and how I prepared day 1 of December.

Thanks for stopping by!

Trinity Stamps

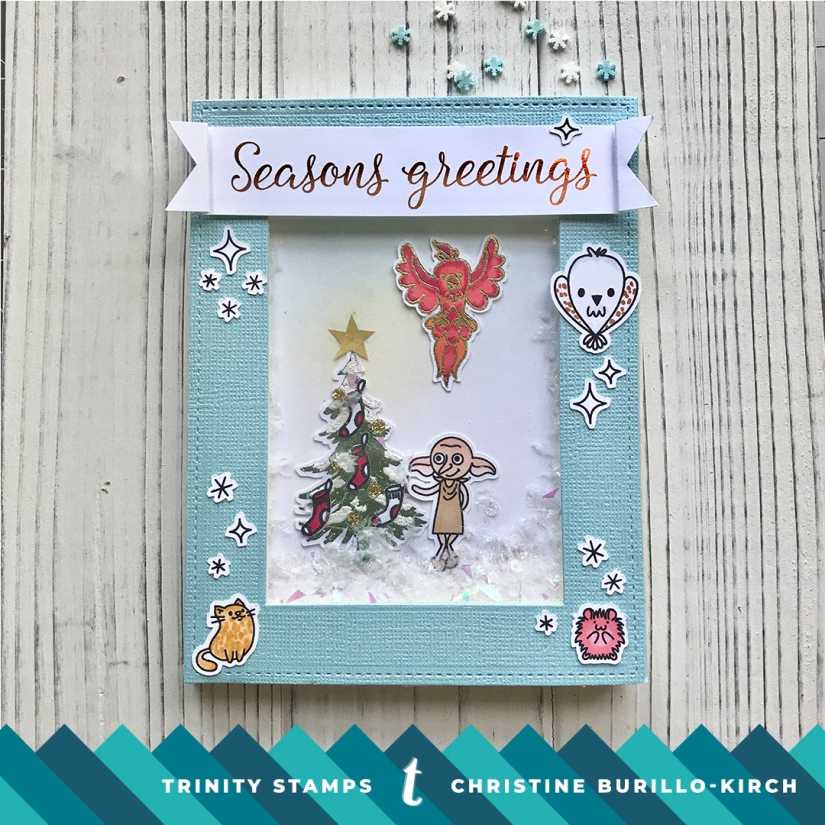
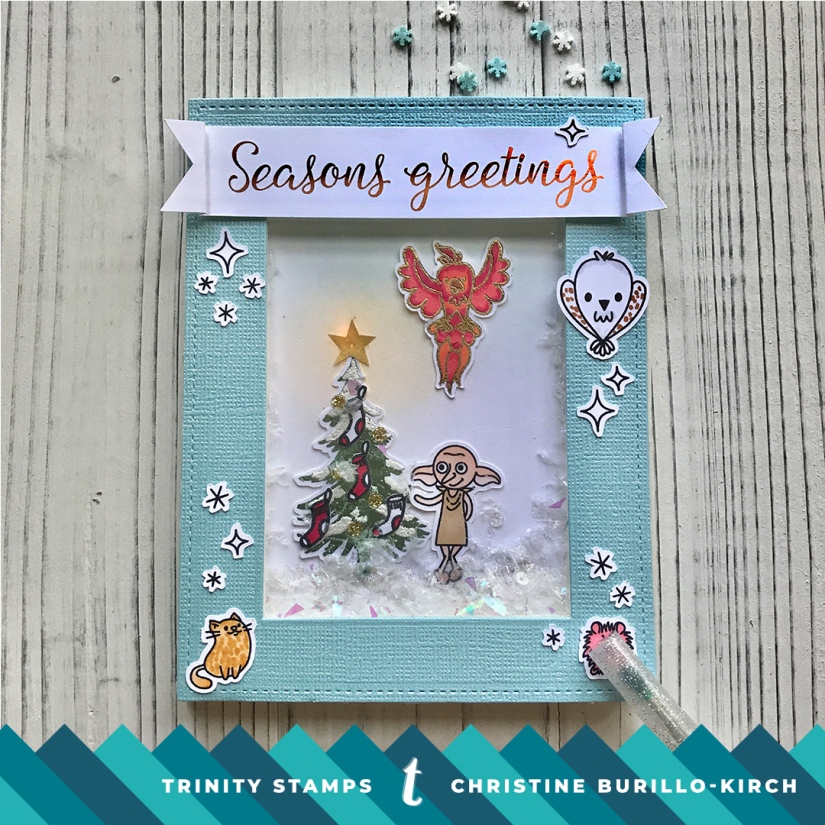
Trinity Stamps Winter Release- Chibitronics Shaker Card

Welcome back!  Trinity Stamps is still celebrating their new winter release– the celebrations continue on Monday! Today I’m sharing details of how I made the card I shared yesterday. I used the Magical Wizards and Seasonal Silhouette stamp sets, along with Chibitronics, to create an interactive card that can be displayed.  All the details are in the video that I have posted here.

45163697_197714941127659_6591223530187128832_o


CBK New release #1CBK New release #2

Hope you will watch my video- thank you for stopping by!

Trinity Stamps

Trinity Stamps Winter 2018 Release Blog Hop

45208529_197715347794285_1202887019529764864_n


Welcome to the Trinity Stamps Blog Hop Release Day!  So excited to show you some of the new products that are being released today. There are so many awesome stamp sets and dies (7 stamp sets & 7 dies)- with something for everyone!  If you are a Harry Potter fan, you are particularly lucky today, there are 3 stamp sets & 1 die set.

I used the Magical Wizards and Seasonal Silhouette stamp sets, along with Chibitronics, to create an interactive card that can be displayed.

CBK New release #1

I wanted to make a shaker card that also lit up- kind of crazy- I know. So I decided to use Chibitronics to create a circuit within the card that lights up the star on the Christmas tree when you press on the area that houses the battery.  I left the connection very loose within the battery compartment, so that the battery would only be “on” position when you actually press down.  Pressing down enable the battery to touch all the copper tape and complete the circuit.  I’ll have a video on YouTube showing exactly how I made this!

CBK New release #2

Trinity Stamps Blog Hop line-up

Christine Kirch  (you are here!)

Donna Lewis

Jo Herbert

Judy Rozema

Karen Reategui

Kimberly Wiener

Sindhu Jay

Don’t forget to leave a comment on each blog for a chance to win the Trinity giveaway (five winners will receive a prize pack valued at over $25 each). Winners will be announced on the Trinity Stamps blog on November 10th. https://blog.trinitystamps.com/we-have-winners/


44950814_197714931127660_7272190174061133824_o

Thank you for stopping by!


Trinity Stamps

Trinity Stamps sneak peek!

I am beyond excited to share a card I made several stamp sets & die set from Trinity Stamps new release. The release will go live next Saturday, Nov 2nd. This week’s video shows how to make a simple slider card without any special dies.  You can find it on YouTube here.
CBK-Harry #1CBK-Harry #2
My video for next week will show more of the stamp sets- so stay tuned! Thanks for stopping by!